2018년 5월 30일 수요일

[Ansible] MAGIC_VARIABLE에 대해서~

- 0 개의 댓글
안녕하세요 ~!

오늘은 말이죠~! MAGIC_VARIABLE에 대해서 말해 보려고 합니다!!
이게 뭘까요?

매직?

magic shadowera에 대한 이미지 검색결과


이런 매직일까요? 하하 (참고로 제가 하는 게임입니다. !!)

그게 아니라 앤서블에 보면 
매직 변수라는게 있습니다. 


[ /usr/lib/python2.7/site-packages/ansible/constants.py ]

2.5.3 버전에서 보여지는 매직 변수인데 잘 눈에 안 들어오네요 


구 버전에 구조를 봅시다. 

MAGIC_VARIABLE_MAPPING = dict(
connection = ('ansible_connection',),
remote_addr = ('ansible_ssh_host', 'ansible_host'),
remote_user = ('ansible_ssh_user', 'ansible_user'),
port = ('ansible_ssh_port', 'ansible_port'),
accelerate_port = ('ansible_accelerate_port',),
password = ('ansible_ssh_pass', 'ansible_password'),
private_key_file = ('ansible_ssh_private_key_file', 'ansible_private_key_file'),
pipelining = ('ansible_ssh_pipelining', 'ansible_pipelining'),
shell = ('ansible_shell_type',),
become = ('ansible_become',),
become_method = ('ansible_become_method',),
become_user = ('ansible_become_user',),
become_pass = ('ansible_become_password','ansible_become_pass'),
become_exe = ('ansible_become_exe',),
become_flags = ('ansible_become_flags',),
ssh_common_args = ('ansible_ssh_common_args',),
docker_extra_args= ('ansible_docker_extra_args',),
sftp_extra_args = ('ansible_sftp_extra_args',),
scp_extra_args = ('ansible_scp_extra_args',),
ssh_extra_args = ('ansible_ssh_extra_args',),
sudo = ('ansible_sudo',),
sudo_user = ('ansible_sudo_user',),
sudo_pass = ('ansible_sudo_password', 'ansible_sudo_pass'),
sudo_exe = ('ansible_sudo_exe',),
sudo_flags = ('ansible_sudo_flags',),
su = ('ansible_su',),
su_user = ('ansible_su_user',),
su_pass = ('ansible_su_password', 'ansible_su_pass'),
su_exe = ('ansible_su_exe',),
su_flags = ('ansible_su_flags',),
executable = ('ansible_shell_executable',),
module_compression = ('ansible_module_compression',),
)
위에 보여지는 내용을 앤서블 플레이북이나, var_group 같은 곳에 넣으면 적용되는 변수들인 것입니다. 미리 정의되어 있는 변수들인거죠 FACTS와 별개로요~!

예를 들면, 코드 상에서 tasks 상에서 lldp의 sudo를 주기 위해서 보통 become에 yes를 넣게 되죠. 

---
- hosts: cl
  gather_facts: no
  tasks:
  - name: lldp service
    become: yes    service: name=lldpd state=restarted

그렇다면, 이런 예는 어떨까요? 

---
- hosts: cl
  gather_facts: no
  remote_user: cumulus
  become: yes
  vars:
    ansible_become_pass: CumulusLinux!
  tasks:
  - name: ssh-keygen
    service: name=lldpd state=restarted


 - remote_user      = ('ansible_ssh_user', 'ansible_user')
 - become_pass = ('ansible_become_password','ansible_become_pass')

쓰는 용법의 차이는 있지만, 이런 식으로 서로 바꾸어 가면서 쓸수 있습니다. 
아직은 완벽하게 어떤 부분은 vars에 쓰고, playbook에 쓰고, hosts에 쓰고가 정리가 되지 않은 느낌이긴 하나.~~ 서로 호환되는 이름이 어떤 것인지 안다면...

구글에서 검색해서 대략 만들수 있겠죠?

:) 도움이 되셨기를요오~!

[Continue reading...]

2018년 5월 21일 월요일

[VyOS] bond 모드에 따른 동작 테스트

- 0 개의 댓글


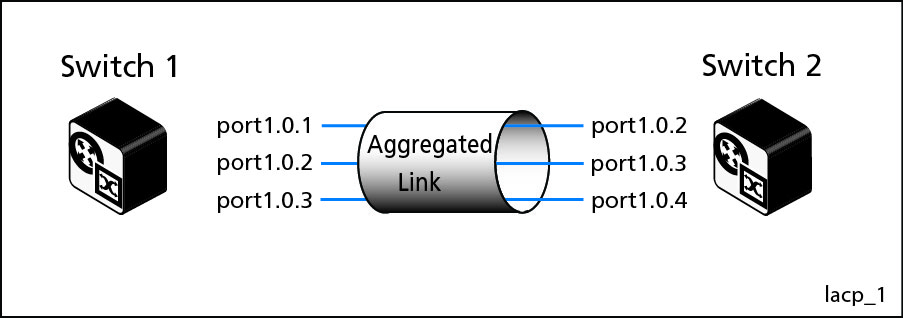
lacp에 대한 이미지 검색결과

내부 자료로 작성했던 건데~!
다른 분들도 재미있어 할꺼 같아서 올려요 :) 


This is some information per bond mode.  

#1. Bond mode 4 (Active-Backup)
  • LACP by eth2 and eth3
  •  
Here is real MAC from switch #1

vagrant@ansible-vyos01:~$ cat /proc/net/bonding/bond0
Ethernet Channel Bonding Driver: v3.7.1 (April 27, 2011)

Bonding Mode: IEEE 802.3ad Dynamic link aggregation
Transmit Hash Policy: layer2 (0)
MII Status: up
MII Polling Interval (ms): 250
Up Delay (ms): 0
Down Delay (ms): 0

802.3ad info
LACP rate: slow
Min links: 0
Aggregator selection policy (ad_select): stable
Active Aggregator Info:
        Aggregator ID: 1
        Number of ports: 2
        Actor Key: 17
        Partner Key: 17
        Partner Mac Address: 08:00:27:d3:c8:d8

Slave Interface: eth2
MII Status: up
Speed: 1000 Mbps
Duplex: full
Link Failure Count: 0
Permanent HW addr: 08:00:27:31:83:08
Aggregator ID: 1
Slave queue ID: 0

Slave Interface: eth3
MII Status: up
Speed: 1000 Mbps
Duplex: full
Link Failure Count: 0
Permanent HW addr: 08:00:27:94:2a:fb
Aggregator ID: 1
Slave queue ID: 0


Here is real MAC from switch #2
vagrant@ansible-vyos02:~$ cat /proc/net/bonding/bond0
Ethernet Channel Bonding Driver: v3.7.1 (April 27, 2011)

Bonding Mode: IEEE 802.3ad Dynamic link aggregation
Transmit Hash Policy: layer2 (0)
MII Status: up
MII Polling Interval (ms): 250
Up Delay (ms): 0
Down Delay (ms): 0

802.3ad info
LACP rate: slow
Min links: 0
Aggregator selection policy (ad_select): stable
Active Aggregator Info:
        Aggregator ID: 1
        Number of ports: 2
        Actor Key: 17
        Partner Key: 17
        Partner Mac Address: 08:00:27:31:83:08

Slave Interface: eth2
MII Status: up
Speed: 1000 Mbps
Duplex: full
Link Failure Count: 0
Permanent HW addr: 08:00:27:d3:c8:d8
Aggregator ID: 1
Slave queue ID: 0

Slave Interface: eth3
MII Status: up
Speed: 1000 Mbps
Duplex: full
Link Failure Count: 0
Permanent HW addr: 08:00:27:b3:34:0f
Aggregator ID: 1
Slave queue ID: 0

And Debug from both.

Switch  #1  on eth2

1590.199790 08:00:27:31:83:08 -> 01:80:c2:00:00:02 LACP Link Aggregation Control Protocol
1590.400544 08:00:27:d3:c8:d8 -> 01:80:c2:00:00:02 LACP Link Aggregation Control Protocol
1620.199776 08:00:27:31:83:08 -> 01:80:c2:00:00:02 LACP Link Aggregation Control Protocol
1620.399886 08:00:27:d3:c8:d8 -> 01:80:c2:00:00:02 LACP Link Aggregation Control Protocol
1650.210313 08:00:27:31:83:08 -> 01:80:c2:00:00:02 LACP Link Aggregation Control Protocol
1650.399770 08:00:27:d3:c8:d8 -> 01:80:c2:00:00:02 LACP Link Aggregation Control Protocol

Switch #1 on eth3
1500.149660 08:00:27:94:2a:fb -> 01:80:c2:00:00:02 LACP Link Aggregation Control Protocol
1500.649315 08:00:27:b3:34:0f -> 01:80:c2:00:00:02 LACP Link Aggregation Control Protocol
1530.149616 08:00:27:94:2a:fb -> 01:80:c2:00:00:02 LACP Link Aggregation Control Protocol
1530.649637 08:00:27:b3:34:0f -> 01:80:c2:00:00:02 LACP Link Aggregation Control Protocol
1560.149682 08:00:27:94:2a:fb -> 01:80:c2:00:00:02 LACP Link Aggregation Control Protocol
1560.649534 08:00:27:b3:34:0f -> 01:80:c2:00:00:02 LACP Link Aggregation Control Protocol
1590.149482 08:00:27:94:2a:fb -> 01:80:c2:00:00:02 LACP Link Aggregation Control Protocol
1590.650209 08:00:27:b3:34:0f -> 01:80:c2:00:00:02 LACP Link Aggregation Control Protocol


AND important thing is 01:80:c2:00:00:02 (Fixed multicast Address)
It is really cool isn’t it?

01-80-C2-00-00-02
0x8809
Ethernet OAM Protocol IEEE 802.3ah (A.K.A. "slow protocols")

Here is more info about 802.3ad and ah too.


#2. Bond mode 1 (Active-Backup)

You may already know what it is.
However there is some tweak for compatible option.

cat /etc/sysconfig/network-scripts/ifcfg-bond0
<snipped>
BONDING_OPTS="miimon=100 mode=active-backup fail_over_mac=1"


2-2.fail_over_mac=0 (default)

MAC per interface
-       All of interface are same MAC (from active INT)

[vagrant@ansible-server ~]$ ifconfig
bond0: flags=5187<UP,BROADCAST,RUNNING,MASTER,MULTICAST>  mtu 1500
        inet 10.10.1.10  netmask 255.255.255.0  broadcast 10.10.1.255
        inet6 fe80::a00:27ff:fe8e:98b8  prefixlen 64  scopeid 0x20<link>
        ether 08:00:27:8e:98:b8  txqueuelen 1000  (Ethernet)
        RX packets 0  bytes 0 (0.0 B)
        RX errors 0  dropped 0  overruns 0  frame 0
        TX packets 8  bytes 648 (648.0 B)
        TX errors 0  dropped 0 overruns 0  carrier 0  collisions 0


eth2: flags=6211<UP,BROADCAST,RUNNING,SLAVE,MULTICAST>  mtu 1500
        ether 08:00:27:8e:98:b8  txqueuelen 1000  (Ethernet)
        RX packets 0  bytes 0 (0.0 B)
        RX errors 0  dropped 0  overruns 0  frame 0
        TX packets 15  bytes 1176 (1.1 KiB)
        TX errors 0  dropped 0 overruns 0  carrier 0  collisions 0

eth3: flags=6211<UP,BROADCAST,RUNNING,SLAVE,MULTICAST>  mtu 1500
        ether 08:00:27:8e:98:b8  txqueuelen 1000  (Ethernet)
        RX packets 0  bytes 0 (0.0 B)
        RX errors 0  dropped 0  overruns 0  frame 0
        TX packets 13  bytes 1086 (1.0 KiB)
        TX errors 0  dropped 0 overruns 0  carrier 0  collisions 0

Bonding info

[vagrant@ansible-server ~]$ cat /proc/net/bonding/bond0
Ethernet Channel Bonding Driver: v3.7.1 (April 27, 2011)

Bonding Mode: fault-tolerance (active-backup)
Primary Slave: None
Currently Active Slave: eth2
MII Status: up
MII Polling Interval (ms): 100
Up Delay (ms): 0
Down Delay (ms): 0

Slave Interface: eth2
MII Status: up
Speed: 1000 Mbps
Duplex: full
Link Failure Count: 0
Permanent HW addr: 08:00:27:8e:98:b8
Slave queue ID: 0

Slave Interface: eth3
MII Status: up
Speed: 1000 Mbps
Duplex: full
Link Failure Count: 0
Permanent HW addr: 08:00:27:ea:f6:6b
Slave queue ID: 0


2-2. fail_over_mac=1

MAC per interface
-       Bond0 and active interface have same MAC.
-       However standby MAC is real MAC

[vagrant@ansible-server ~]$ ifconfig
bond0: flags=5187<UP,BROADCAST,RUNNING,MASTER,MULTICAST>  mtu 1500
        inet 10.10.1.10  netmask 255.255.255.0  broadcast 10.10.1.255
        inet6 fe80::a00:27ff:fe8e:98b8  prefixlen 64  scopeid 0x20<link>
        ether 08:00:27:8e:98:b8  txqueuelen 1000  (Ethernet)
        RX packets 0  bytes 0 (0.0 B)
        RX errors 0  dropped 0  overruns 0  frame 0
        TX packets 9  bytes 724 (724.0 B)
        TX errors 0  dropped 0 overruns 0  carrier 0  collisions 0

eth2: flags=6211<UP,BROADCAST,RUNNING,SLAVE,MULTICAST>  mtu 1500
        ether 08:00:27:8e:98:b8  txqueuelen 1000  (Ethernet)
        RX packets 0  bytes 0 (0.0 B)
        RX errors 0  dropped 0  overruns 0  frame 0
       TX packets 24  bytes 1900 (1.8 KiB)
        TX errors 0  dropped 0 overruns 0  carrier 0  collisions 0

eth3: flags=6211<UP,BROADCAST,RUNNING,SLAVE,MULTICAST>  mtu 1500
        ether 08:00:27:ea:f6:6b  txqueuelen 1000  (Ethernet)
        RX packets 0  bytes 0 (0.0 B)
        RX errors 0  dropped 0  overruns 0  frame 0
        TX packets 13  bytes 1086 (1.0 KiB)
        TX errors 0  dropped 0 overruns 0  carrier 0  collisions 0

Bonding info
[vagrant@ansible-server ~]$ cat /proc/net/bonding/bond0
Ethernet Channel Bonding Driver: v3.7.1 (April 27, 2011)

Bonding Mode: fault-tolerance (active-backup) (fail_over_mac active)
Primary Slave: None
Currently Active Slave: eth2
MII Status: up
MII Polling Interval (ms): 100
Up Delay (ms): 0
Down Delay (ms): 0

Slave Interface: eth2
MII Status: up
Speed: 1000 Mbps
Duplex: full
Link Failure Count: 0
Permanent HW addr: 08:00:27:8e:98:b8
Slave queue ID: 0

Slave Interface: eth3
MII Status: up
Speed: 1000 Mbps
Duplex: full
Link Failure Count: 0
Permanent HW addr: 08:00:27:ea:f6:6b
Slave queue ID: 0

What if active interface is down?
  • Bond0’s MAC change to standby’s MAC. i.e. MAC is changed the perspective of receiver(switch?)

eth3: flags=6211<UP,BROADCAST,RUNNING,SLAVE,MULTICAST>  mtu 1500
        ether 08:00:27:ea:f6:6b  txqueuelen 1000  (Ethernet)
        RX packets 0  bytes 0 (0.0 B)
        RX errors 0  dropped 0  overruns 0  frame 0
        TX packets 27  bytes 2160 (2.1 KiB)
        TX errors 0  dropped 0 overruns 0  carrier 0  collisions 0

bond0: flags=5187<UP,BROADCAST,RUNNING,MASTER,MULTICAST>  mtu 1500
        inet 10.10.1.10  netmask 255.255.255.0  broadcast 10.10.1.255
        inet6 fe80::a00:27ff:feea:f66b  prefixlen 64  scopeid 0x20<link>
        ether 08:00:27:ea:f6:6b  txqueuelen 1000  (Ethernet)
        RX packets 0  bytes 0 (0.0 B)
        RX errors 0  dropped 0  overruns 0  frame 0
        TX packets 21  bytes 1688 (1.6 KiB)
        TX errors 0  dropped 0 overruns 0  carrier 0  collisions 0


And this mode have drawback. If you have interest about it, please refer to below.
Using "fail_over_mac=active" on Ethernet devices has other drawbacks, e.g. if gratuitous ARP is lost or incorrectly processed after a failover, bond is not accessible until it sends a packet.

Reference:

Source Code:

[Continue reading...]

2018년 5월 16일 수요일

[VyOS] VRRP 구성하기

- 0 개의 댓글
안녕하세~~~요오~!

요즘 앤서블 가지고 뭔가 하고 있어서....하하;;
NOS를 찾다 보니 VyOS라는 것을 찾았답니다. (그나마 네트워크 운영체제 처럼 생겨 있는거?)

물론 큐뮬러스라는게 있어서..그것도 함께 사용하고 있긴 하지만...하하 얘는 좀 독특해서
우선 VyOS로 VRRP를 구성 테스트 한 결과를 공유할려고 합니다~!


관련 이미지

간단하게 

VyOS로 3개의 구성을 다음처럼 하려고 해요~!

<VRRP Master / R1>            <VRRP Backup / R2>

            |                          |
     
                 < VRRP Leaf #1>


이미지는 베이그런트 클라우드에 올려둔 제 이미지를 사용했습니다~!
https://app.vagrantup.com/sysnet4admin/boxes/VyOS

구성 요약
<R1>
set interfaces ethernet eth2 address 10.0.0.11/24
set interfaces ethernet eth2 vrrp vrrp‐group 10
set interfaces ethernet eth2 vrrp vrrp‐group 10 virtual‐address 10.0.0.10/24
set interfaces ethernet eth2 vrrp vrrp‐group 10 preempt true
set interfaces ethernet eth2 vrrp vrrp‐group 10 priority 150
commit
save
<R2>
set interfaces ethernet eth2 address 10.0.0.12/24
set interfaces ethernet eth2 vrrp vrrp‐group 10
set interfaces ethernet eth2 vrrp vrrp‐group 10 virtual‐address 10.0.0.10/24
set interfaces ethernet eth2 vrrp vrrp‐group 10 priority 100
commit
save

<Leaf #1>
set interfaces ethernet eth2 address 10.0.0.13/24

상태 요약 for VRRP:
<R1>
vagrant@vyos:~$ show vrrp                   
                                 RFC        Addr   Last        Sync
Interface         Group  State   Compliant  Owner  Transition  Group
---------         -----  -----   ---------  -----  ----------  -----
eth2              10     MASTER  no         no     1m43s       <none>


<R2>
vagrant@vyos:~$ show vrrp
                                 RFC        Addr   Last        Sync
Interface         Group  State   Compliant  Owner  Transition  Group
---------         -----  -----   ---------  -----  ----------  -----
eth2              10     BACKUP  no         no     1m55s       <none>


여기서 저를 비롯한 많은 분들이 헷깔리실텐데요.
하하하;; 나만 그런가...
priority 높은게 대장입니다.

저는 솔직히 낮은게 좋은데 말이죠...ㅠㅠ


상태 요약 from Leaf #1:

vagrant@ansible-vyos03:~$ show arp
Address                  HWtype  HWaddress           Flags Mask            Iface
10.0.2.2                 ether   52:54:00:12:35:02   C                     eth0
10.0.2.3                 ether   52:54:00:12:35:03   C                     eth0
10.0.0.11                ether   08:00:27:25:c3:42   C                     eth2
10.0.0.10                ether   08:00:27:25:c3:42   C                     eth2

여하튼 ping을 여기서 10.0.0.10으로 보내고 Master 노드를 Reboot을 시키면요.

vagrant@ansible-vyos03:~$ ping 10.0.0.10
PING 10.0.0.10 (10.0.0.10) 56(84) bytes of data.
<snipped>
64 bytes from 10.0.0.10: icmp_req=44 ttl=64 time=0.256 ms
64 bytes from 10.0.0.10: icmp_req=45 ttl=64 time=0.257 ms
From 10.0.0.12: icmp_seq=46 Redirect Host(New nexthop: 10.0.0.10)
From 10.0.0.12: icmp_seq=47 Redirect Host(New nexthop: 10.0.0.10)
64 bytes from 10.0.0.10: icmp_req=46 ttl=64 time=1767 ms
64 bytes from 10.0.0.10: icmp_req=47 ttl=64 time=766 ms
64 bytes from 10.0.0.10: icmp_req=48 ttl=64 time=0.623 ms

이런 메시지가 찍히면서, nexthop이 바뀐다고 하네요

그리고

vagrant@ansible-vyos03:~$ show arp
Address                  HWtype  HWaddress           Flags Mask            Iface
10.0.2.2                 ether   52:54:00:12:35:02   C                     eth0
10.0.2.3                 ether   52:54:00:12:35:03   C                     eth0
10.0.0.12                ether   08:00:27:00:78:62   C                     eth2
10.0.0.11                ether   08:00:27:25:c3:42   C                     eth2
10.0.0.10                ether   08:00:27:25:c3:42   C                     eth2


10.0.0.12 부분이 추가가 되긴 하는데요... (Backup이었던 노드)

분명히 RFC 3768에서는

7.3. Virtual Router MAC Address

The virtual router MAC address associated with a virtual router is an IEEE 802 MAC Address in the following format: 00-00-5E-00-01-{VRID} (in hex in internet standard bit-order) The first three octets are derived from the IANA's OUI. The next two octets (00-01) indicate the address block assigned to the VRRP protocol. {VRID} is the VRRP Virtual Router Identifier. This mapping provides for up to 255 VRRP routers on a network.


00-00으로 잡아야 한다고 했는데 왜 얘는...물리 인터페이스 MAC을 -_-

허허허.....


그래서 VRRP 구성 노드들 (Master / Backup)에

set interfaces ethernet eth2 vrrp vrrp-group 10 rfc3768-compatibilit

호환되어라 하는 구성을 넣어 주니...재밌는게..
Leaf #1에서는 맥을 받아 오는데...ICMP에 응답을 안 해줍니다. -_-
어쩌라는건지...

vagrant@ansible-vyos03:~$ show arp
Address                  HWtype  HWaddress           Flags Mask            Iface
10.0.2.2                 ether   52:54:00:12:35:02   C                     eth0
10.0.2.3                 ether   52:54:00:12:35:03   C                     eth0
10.0.0.12                ether   08:00:27:00:78:62   C                     eth2
10.0.0.11                ether   08:00:27:25:c3:42   C                     eth2
10.0.0.10                ether   00:00:5e:00:01:0a   C                     eth2

vagrant@ansible-vyos03:~$ ping 10.0.0.10
PING 10.0.0.10 (10.0.0.10) 56(84) bytes of data.

--- 10.0.0.10 ping statistics ---
14 packets transmitted, 0 received, 100% packet loss, time 13020ms


이 때 인터페이스가 특이하네요....

<R1>
vagrant@vyos:~$ show arp
Address                  HWtype  HWaddress           Flags Mask            Iface
192.168.1.5              ether   bc:5f:f4:e6:b0:f3   C                     eth1
10.0.0.13                ether   08:00:27:93:89:dd   C                     eth2v10

<R2>
vagrant@vyos:~$ show arp
Address                  HWtype  HWaddress           Flags Mask            Iface
192.168.1.5              ether   bc:5f:f4:e6:b0:f3   C                     eth1

<leaf #1>
vagrant@ansible-vyos03:~$ show arp
Address                  HWtype  HWaddress           Flags Mask            Iface
10.0.2.2                 ether   52:54:00:12:35:02   C                     eth0
10.0.2.3                 ether   52:54:00:12:35:03   C                     eth0
10.0.0.12                ether   08:00:27:00:78:62   C                     eth2
10.0.0.11                ether   08:00:27:25:c3:42   C                     eth2
10.0.0.10                        (incomplete)                              eth2

인터페이스가 내부적으로 꼬인거 같네요 -_- 허허허허


====================================

여하튼 아주 간단하게 테스트는 가능하다는 것을 보여주네요 

참고로 VyOS와 Cumulus 구성을 섞어서는 되지 않았습니다. inanet으로는요. 

다 브릿지 하면 될수도....


그래두 Cumulus IP 하는 방법을 정리차원에서 넣어 둡니다~!

Cumulus IP 세팅하는 방법
sudo net add interface swp2 ip address 10.0.0.101/24
sudo net add interface swp2 ip gateway 10.0.0.10
sudo net pending  <<< 이건 확인하는 것
sudo net commit 

[Continue reading...]

2018년 5월 7일 월요일

[vagrant] windows2016 for Ansible

- 0 개의 댓글
안녕하세요!!

며칠 전에 유데미와 인프런 강의를 통해서도 안내했지만...
블로그에 오시는 분들도 도움이 되시면 좋을 것 같아서요 :)
앤서블 테스트용 windows 2016를 포팅했습니다!! 짝짝짝 셀프 짝~!
필요하신 분들은 사용하시면 될 것 같아요~~!


Windows 2016으로 실습 가능하도록 작성하고, 베이그런트 포장하여 올려두었습니다. 

해당 주소는 다음과 같고요..
https://app.vagrantup.com/sysnet4admin/boxes/Windows2016

사용법은 기존에 이미지에서 'sysnet4admin/windows2016' 로 이미지(박스) 이름만 변경하시면 됩니다. 

예시도 함께 드립니다~!
< 예시>
c:\HashiCorp>vagrant up ansible-node07
Bringing machine 'ansible-node07' up with 'virtualbox' provider...
==> ansible-node07: Importing base box 'sysnet4admin/windows2016'...
==> ansible-node07: Matching MAC address for NAT networking...
==> ansible-node07: Checking if box 'sysnet4admin/windows2016' is up to date...
==> ansible-node07: Setting the name of the VM: Ansible-Node07(github_SysNet4Admin)
==> ansible-node07: Clearing any previously set network interfaces...
==> ansible-node07: Preparing network interfaces based on configuration...
    ansible-node07: Adapter 1: nat
    ansible-node07: Adapter 2: bridged
==> ansible-node07: Forwarding ports...
    ansible-node07: 22 (guest) => 60017 (host) (adapter 1)
    ansible-node07: 5985 (guest) => 55985 (host) (adapter 1)
    ansible-node07: 5986 (guest) => 55986 (host) (adapter 1)
==> ansible-node07: Running 'pre-boot' VM customizations...
==> ansible-node07: Booting VM...
==> ansible-node07: Waiting for machine to boot. This may take a few minutes...
    ansible-node07: WinRM address: 127.0.0.1:55985
    ansible-node07: WinRM username: vagrant
    ansible-node07: WinRM execution_time_limit: PT2H
    ansible-node07: WinRM transport: negotiate
==> ansible-node07: Machine booted and ready!
Sorry, don't know how to check guest version of Virtualbox Guest Additions on this platform. Stopping installation.
==> ansible-node07: Checking for guest additions in VM...
==> ansible-node07: Setting hostname...
==> ansible-node07: Configuring and enabling network interfaces...
==> ansible-node07: Running provisioner: shell...
    ansible-node07: Running: inline PowerShell script
    ansible-node07: Ok.

[Continue reading...]
 
Copyright © . 쿠버네티스 전문가 블로그 - Posts · Comments
Theme Template by BTDesigner · Powered by Blogger